18 Aug 2014
A couple of weeks ago I was contracted to run a basic phishing campaign. The overall goal of the campaign was to raise awareness, not to gather credentials or to execute code. The requirements included identifying which user clicked on the phishing links and recording any email responses from the targets. The basic process I followed is outlined below.
- Register a domain name and configure SPF records.
- Setup a phishing server.
- Build the phishing site.
- Listen for email responses.
- Send the phishing emails.
Configure the Domain and SPF Record
A few years ago I started using Namecheap for my domain name registrations and DNS hosting. They have great prices and their service is easy to use. For this campaign I went to NameCheap and registered a domain very similar to the target organization.
For a phishing campaign to be successful you have to bypass the target's spam filters. Before a spam filter looks at the content of the email it makes sure the mail servers DNS records are in order. First, the IP address you are sending your phishing emails from should have an MX record associated with it. Second, there should be a reverse DNS record associated with the hostname in the MX record. Keep in mind, the reverse DNS record cannot be configured at NameCheap, it has to be configured with the ISP who provides the IP address. Finally, there should be an Sender Policy Framework (SPF) record that specifies the IP address and DNS names of servers allowed to send mail from your domain.
SPF records must be written in a particular format, which I can never remember. So, I use the SPF wizard provided by Microsoft to generate the SPF record for me.
For more information on setting up a phishing domain, check out Raphael Mudge's excellent blog post, Email Delivery - What Every Pentester Should Know.
Setup a Server
There are a number of ways to get a small server to use for phishing but my preferred option is DigitalOcean because they are cheap and the servers are very easy to setup. First, you will need to register for a DO account or login if you already have one. Once you are at the dashboard, create a new droplet. The hostname for the droplet should be the same as the hostname used in the MX record. DigitalOcean will automatically create a PTR record that maps the droplet's IP address to the hostname. I use the smallest server size, which is more than enough power to run the phishing campaign. Once the server is running, install and configure a web server.
Build the Phishing Site
For this contract there were two campaigns. For the first campaign the goal was to convince the target to click on a link in the email and visit the phishing site. The phishing site was just a static web page that provided the user with an awareness message. For the second campaign, the goal was to convince the target to visit a fake OWA site and attempt to enter credentials. If a target attempted to enter credentials then they were redirected to the awareness message. I used a bit of Javascript to handle the redirection, onclick="parent.location='http://<phish_server>/awareness.html'". For both campaigns, the client wanted to know which targets followed the links and for the second campaign the client wanted to know who attempted to enter OWA credentials.
Each target user was sent a link with a unique id number so that each web page visit could be tracked to a particular user. On each of the links I simply added a query parameter called id and gave it an incremental value for each user. So user 1 would have a link like http://<phishing_site>/awareness.html?id=1. Since the id value was sent as a query parameter, the web server logs could be used to pull stats on who visited each page and how often. Unfortunately, the client's Barracuda Spam filter saw the id value and decided the links were tracking links and blocked the messages. The client allowed the quarantined messages to go through but I need to come up with a new strategy for the future.
Listen for Email Responses
Whenever a phishing campaign is run there will inevitably be targets who respond to the phishing emails with questions or automatic replies. The client wanted to track any email responses from the targets. Not wanting to setup sendmail just to listen for emails, I decided to write a Python script that would listen on port 25 and write to a file any emails received. The Python script is available on my GitHub account. The script must be run as root so that it can listen on port 25.
Send the Phishing Emails
Between the two campaigns I needed to send 150 emails. Not wanting to do this by hand, I again turned to Python to get the job done. I created a JSON file with one entry for each target. Each entry contained the variables that I would plug into my phishing template, including the unique identifier for the user, and the phishing campaign for which the target was involved. The script read the JSON file and for each user built the correct email from the template and sent the message. You can find a sample JSON file and the Python script on my GitHub account as well. This script does not need root permission.
Final Thoughts
Once the campaign was over, I was able to gather statistics on which users followed the links in the emails and which users attempted to enter credentials by reviewing the web server logs. Also note, the Javascript used to redirect users to the warning page could easily be rewritten to gather the credentials before redirecting to the warning page or the real site.
12 Jun 2014
I've been participating in bug bounties with BugCrowd and one of the first things I check for is username/email enumeration on the login page and the forgotten password page. Some of the companies running the bug bounties explicitly state that they will not pay for user enumeration vulnerabilities. These companies feel username/email enumeration is a low-risk vulnerability because Phishers target large groups of email addresses instead of email addresses associated with a particular target. In addition, they feel it is low-risk because they believe the account lockout policies they have in place will protect them from password attacks. Unfortunately, neither of these assumptions are correct.
Spammers typically send messages indiscriminantly while phishers typically send their messages to a specific set of targets. As an attacker if I can use your login or forgotten password page to narrow my list from 10000 targets to 1000 targets, I will.
While account lockout policies are a good thing and can prevent certain password guessing attacks they can also be worked around with proper timing. Also, depending on how long the account lockout lasts and whether the account must manually be reset, an attacker could easily cause a DoS for your users or your helpdesk personnel.
Finally, an attacker with a large enough set of valid email addresses would only need to try three or four common passwords with each email address to gain access to a significant number of accounts. These three or four failed password attempts will typically not trigger an account lockout.
Username/email enumeration is not the end of the world but it is certainly something that should be fixed and is typically easy to fix. When a user fails to login, don't tell the user whether the username or the password failed. Simply say the login attempt failed. When a user submits their username/email to the forgotten password form don't tell them whether the username/email was found or not. Simply tell them that an email is on the way.
UPDATE 6/13/2014
A couple of people on Twitter pointed out that there will always be at least one username enumeration vulnerability on sites where users self-register. That vulnerability will be in the account creation process. Another user said this vulnerability is not preventable without ruining the user experience. I'm not a UX guru so I have no idea whether this is true or not.
In either case, the danger of username enumeration comes from the fact that an attacker is able to gather one of the two pieces of information needed to login to the site. If we cannot prevent an attacker from getting half of the login information maybe the answer is to require more login information, ie multi-factor authentication. With proper multi-factor authentication you still run the risk of creating a denial of service by locking out accounts but you eliminate the more dangerous vulnerability of user accounts being compromised on a massive scale.
23 May 2014
Really it's more of a training manual. Around June or July of last year I decided I wanted to teach an intro level penetration testing class aimed at system administrators. The purpose of the class would be to teach sysadmins how to attack and hopefully better defend their systems. In the months before the class I wrote a detailed training manual covering all of the topics of the class. The training manual included a number of hands on, step-by-step labs to demonstrate the topics covered. Once the class was over, I decided to publish the training manual. After making a number of revisions based on the feedback from the class and feedback from an editor, I finally published the manual.
I would highly recommend this manual for anyone who is interested in learning penetration testing. It provides a nice overview of the common phases of a penetration test and the common vulnerabilities encountered when doing a penetration test. The manual was originally written to be the basis for an in person training event but can be used as a self-study guide as well. You can get a copy of the book for yourself or for the system administrators in your life here.
The labs in the manual require Kali Linux and Metasploitable2 which are both freely available here and here. I would like to thank Offensive Security and Rapid7 for making these great tools available.
24 Jan 2014
Robots.txt and Sitemap.xml files are extremely useful when managing web crawlers but they can also be dangerous when they give away too much information. So what are these files and how are they used?
Many years ago, web site owners and web crawlers developed a method to allow web site owners to politely ask web crawlers not to crawl certain portions of a site. This is done by defining a robots.txt file (Robots Exclusion Standard). For the most part, this standard is adhered to by web crawlers.
A typical robots.txt file looks like this.
#Google Search Engine Robot
User-agent: Googlebot
Allow: /?_escaped_fragment_

Allow: /search?q=%23
Disallow: /search/realtime
Disallow: /search/users
Disallow: /search/*/grid

Disallow: /*?
Disallow: /*/followers
Disallow: /*/following

Disallow: /account/not_my_account

#Yahoo! Search Engine Robot
User-Agent: Slurp
Allow: /?_escaped_fragment_

Allow: /search?q=%23
Disallow: /search/realtime
Disallow: /search/users
Disallow: /search/*/grid

Disallow: /*?
Disallow: /*/followers
Disallow: /*/following

Disallow: /account/not_my_account
This is a portion of Twitter's robots.txt file. Notice how Twitter tells the search engines which portions of the site are allowed to be crawled and not allowed to be crawled.
Tonight, while surfing the web I found this robots.txt file. I'll let you guess which site it goes to.
Sitemap: http://data.healthcare.gov/sitemap-data.healthcare.gov.xml
Notice that there are no Disallow directives. Based on the accepted convention, the web site owner gives all web robots permission to crawl the entire site. Theoretically, you could write your own robot and legally crawl the entire site.
Along with the agreement to use robots.txt files, web site owners and web crawlers also decided to use a sitemap.xml file to explicitly define the structure of the web site and the URLs "on a website that are available for crawling" (Sitemaps). The Sitemap directive can be added to the robots.txt file to tell web crawlers where to find the sitemap file.
If we look at the sitemap for data.healthcare.gov we can see the URLs, which by convention, we are EXPECTED to crawl or visit as users.
<sitemapindex xmlns="http://www.sitemaps.org/schemas/sitemap/0.9">
  <sitemap>
    <loc>http://data.healthcare.gov/sitemap-datasets-data.healthcare.gov0.xml</loc>
  </sitemap>
  <sitemap>
    <loc>http://data.healthcare.gov/sitemap-users-data.healthcare.gov0.xml</loc>
  </sitemap>
</sitemapindex>
This sitemap file tells us about two additional sitemap files. The sitemap-users-data.healthcare.gov0.xml file looks interesting.
<urlset xmlns="http://www.sitemaps.org/schemas/sitemap/0.9">
  <url>
    <loc>http://data.healthcare.gov/profile/Bill-Fencken/ta6q-868x</loc>
    <lastmod>2010-12-06</lastmod>
  </url>
  <url>
    <loc>http://data.healthcare.gov/profile/Wahid-Saleemi/u63n-yr8b</loc>
    <lastmod>2010-12-06</lastmod>
  </url>
  <url>
    <loc>http://data.healthcare.gov/profile/Debbie-York/45wa-c5qw</loc>
    <lastmod>2010-12-06</lastmod>
  </url>
This sitemap file tells us the profile link for a number of user accounts. In fact, it provides links to approximately 3900 user accounts. Again, based on convention, robots are EXPECTED to visit each of these links and download the page at the link. You can see that Google did exactly this by running this query.
So, let's download a page. When you visit a page in a browser, the page is downloaded and rendered by the browser. When a robot or search engine downloads the page they read and parse the HTML code that makes up the page. To see this HTML code, you can right-click on the page in your browser and choose View Source, or something similar depending on your browser. The source code looks like this.
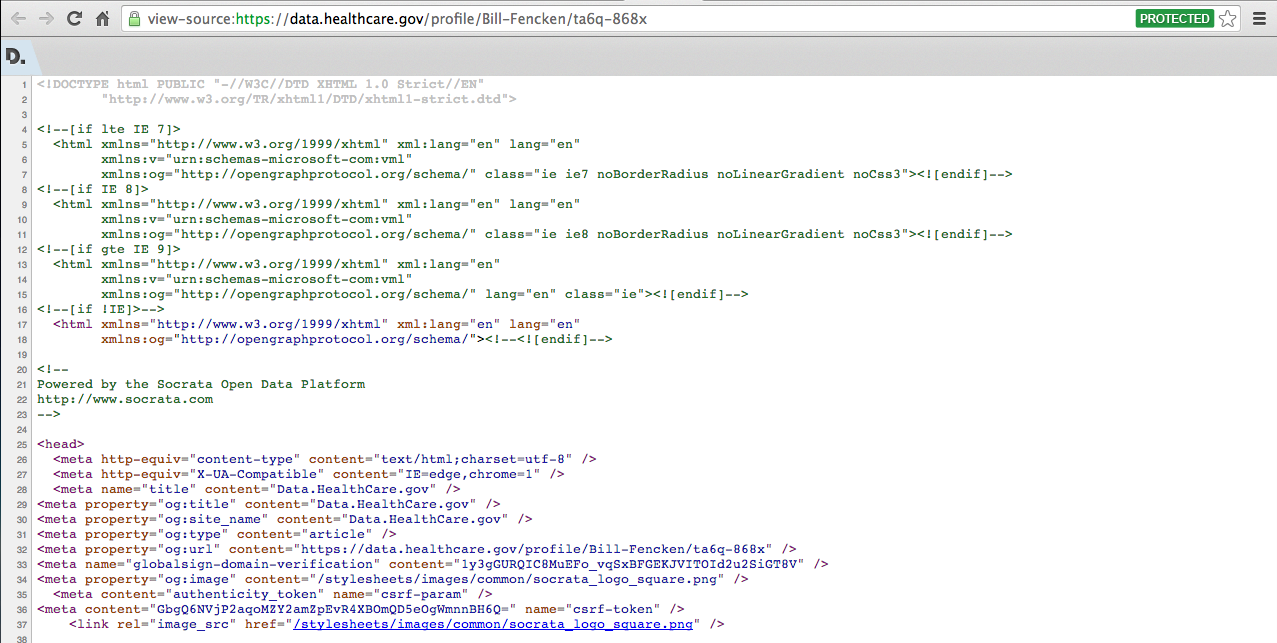
Note, the source code is full of links to other portions of the data.healthcare.gov site, which, by convention, we are allowed to crawl because the robots.txt file does not define any disallowed portions of the site. One such link, /api/users/ta6q-868x?method=contact, is found about 1/3 of the way down the page. Visiting this page produces an error message in JSON format, which means a web crawler like Google will likely ignore this page.
{
  "code" : "method_not_allowed",
  "error" : true,
  "message" : "GET not allowed"
}
On a more serious note, a typical attack against websites includes enumerating user accounts and then attempting to brute-force the associated password. Typically, an attacker has to work to find a method to enumerate user accounts but in this case the sitemap file provides a list of user accounts. Personally, I think it would be wise to remove the sitemap file at http://data.healthcare.gov/sitemap-users-data.healthcare.gov0.xml.
08 Nov 2013
The other day I was reading about the dangers of having your Rails secret token in your version control system. The TL;DR version is secret tokens are used to calculate the HMAC of the session data in the cookie. If you know the secret token you can send arbitrary session data and execute arbitrary code.
So I decided I'd go digging through Github to see if anyone had uploaded secret tokens to the site. Sure enough, there were more than a few secret tokens. This isn't all bad because Rails allows different configuration settings in the same application depending on whether the app is in production or development and most of the Rails apps used a strong secret_token read from an environment variable or generated by SecureRandom for the production site but a weak secret_token for development the site.
I took a few minutes to record the secret tokens I found and decided to see if I could find any of them in use on Internet facing sites. To test this I went to Shodan to find Rails servers and found approximately 70,000 servers. I downloaded the details for about 20,000 of those servers and looked at the cookies to identify the ones running Rails apps. Rails cookies are distinct because they consist of a base64 encoded string followed by a -- and then a HMAC of the base64 string. This gives a cookie, which looks like this.
_Lm2Web_session=BAh7BjoPc2Vzc2lvbl9pZCIlOGY0NTUyMWIyMDMw
NzVmNzI1NjY2ZWEyODg0MzY0ODA%3D--1cad1b4cd816f15162af4ab
97598032a994668be
Of the roughly 20,000 Rails servers, for which I had details, only about 10,000 had cookies that matched the pattern above.
The digest of the cookie is produced by calculating the HMAC of the base64 string using the SHA1 hashing algorithm and the secret token as the salt. To find the secret token we simply calculate the HMAC using each of the potential secret tokens as the salt and see if the calculated digest matches the digest in the cookie. Of the approximately 10,000 cookies, I was able to find 7 secret tokens. This is not very impressive at all but it gave me hope to try a larger test.
I decided to check the Alexa top 1 million web sites to see how many used a cookie with a digest, and for how many I could find the secret token. I've tested about 40,000 sites so far and have only found 303 sites that use a cookie that matches the pattern above. Of those 303 sites, I did not find any of the secret tokens. The results are not surprising and I realize this is a long shot that will probably come to nothing but sometimes you just have to test a theory. If I finish the testing I'll update the blog post with the final stats.
Although I haven't tried it yet, I believe that if you ran the same test on an internal network you would have more success because there is more likely to be development Rails servers on an internal network. If you'd like to try this on your network you can get the rails_find.py, rails_secret_token.py, and rails_secret_tokens.text files here. The rails_find.py script takes a list of host names or IP addresses and writes any matching cookies to a file. The rails_secret_token.py script takes a file of cookies and the rails_secret_tokens.txt file and tests each token against each cookie.
If you do find a secret token during your testing, Metasploit will get you remote code execution.
Enjoy.